

6/29/2012
Lazy Days of Summer - Beach Themed
So I joined another summer themed challenge... The Lazy Days of Summer. This one is a go at your own pace so I can easily do both challenges. I already have so many cool ideas. So week one is Beach Themed. Now I am not the best artist but I def try... need better nail art brushes!

6/28/2012
I'm sooo excited!
I was bummed last night when I had seen I missed out on getting Floam. I got the email this morning and got me a bottle :) Same thing happened with Sticks n Stones.
DIY Nail Art Tools From Around Your House by Beautylish
In addition to their day jobs, some of the most mundane household items can help you achieve your next manicured magnum opus—we’re talking animal textures and needlepoint-like accuracy! We’ve scoured the pantry and the craft bin for our favorite gadgets and gizmos, and discovered that they lead double lives in the world of nail art.
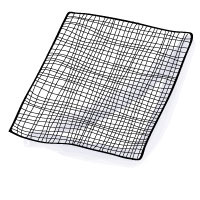 Cheesecloth
Yep—the thin, curd-happy weave moonlights in the nail world! When dipped in lacquer, spread apart with fingers, and imprinted onto nails, cheesecloth creates an easy, stenciled fishnet overlay without hand-painting lattice.
_________________________________
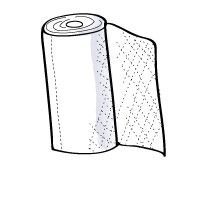
Paper Towels
We love the stippled effect of snakeskin on nails, but how do you achieve the serpentine finish without splurging on a real snakeskin manicure? The fibrous texture of a paper towel is strangely identical to our reptilian friends. Simply, dab a small amount of polish onto a small piece of the towel, then sponge haphazardly onto nails.
_________________________________
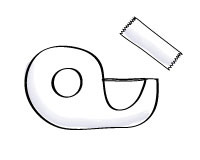
Tape
As steady as our hands can get, nothing gives a nail design more precision than tape. From color-blocking to striping, the geometric effects are endless and easy to achieve!
_________________________________
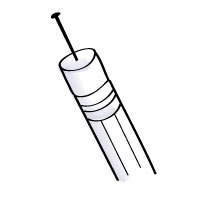
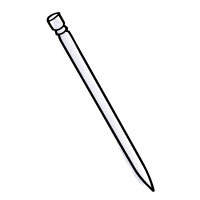
Needles and Pencils
Finely crafted details are difficult to master, even with every nail art brush in the book! For intricate line work, build yourself a needlepoint tip. Stick a sewing needle into the end of any pencil with an eraser end, then scallop, swish, and speckle away!
_________________________________
 Toothpicks
From micro points to polka dots, a toothpick is the obvious choice for dotting. Be sure to purchase picks with flattened bases for an extra shape to play with!
_________________________________
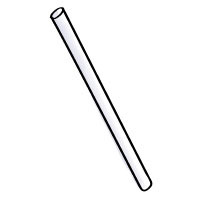
Straws
We can’t imagine painting a thin, ringed outline on our fingertips, let alone a full hand! Plastic straws are convenient for these circular conundrums. Drop some polish on a plastic surface, then dip your straw like you’re rimming a martini glass. Press the straw onto your nails for an abstract pattern.
_________________________________
 Stamps
Stamps can imprint lacquer just like ink! Spread a transparent layer of nail polish over plastic, then press the stamp onto the polish as you would an ink pad. Push the stamp onto each nail, picking up more pigment when necessary. After each use, be sure to clean off the rubber with acetone to avoid buildup.
http://www.beautylish.com/a/vcgwg/diy-nail-art-tools

The Summer Fun Challenge Day 4
When I thought of summer's scorching temps, the sun came to mind... a no brainer. I thought it would be cool to do half suns instead of half moons. I thought a red to orange gradient seemed like a fitting idea. I put the red closest to the sun because it is the hottest place. I think they are kinda cute :)


6/27/2012
Frosty Spectrum
Since I am posting so many busy looks, I thought I would take a quick break and flaunt my vibrant blue nails. I added a little bit of spectraflair on top for a subtle holo. I couldn't resist the glitter :)

Quick Tip: Tighten The Line by TBD
I hate when I can see skin showing between my lashes and liner. Sometimes I correct it from underneath if it is being stubborn. I like the Physicians Formula Eye Booster 2-in-1 Lash Boosting Eyeliner + Serum in
Ultra Black. Anyways, on to the tip...
Maybe I’m a bit neurotic because I’m a makeup artist, but please hear my case! All day long when I’m making eye contact with people, I can’t help but notice that they lined their upper lid, but left a small space of skin peeking through between their lashes {even more so than in the photograph above!}. This bothers me only because we line our upper lids to create an illusion of waking up the eye, but if the line doesn’t go all the way to the actual lash line, the illusion isn’t created; rather it just looks like we merely drew a line across. So I’m asking you to take the 15 seconds to go back and fill in the holes to complete the illusion.
Here’s how:
- Reach around and over your head to gently lift the lid upwards, giving you better access to the lashline.
- With a felt-tip liner pen, fill in the “holes” or anywhere you see exposed skin by sneaking the liner in between your lashes and marking over the space.
That’s it! Remember, makeup artistry is not only about pretty palettes and making statements with bold lips, it’s also about creating illusions by playing with depths, shadows + light. This small effort really helps make the difference of having the eye appear more awake and open.
http://thebeautydepartment.com/2012/06/quick-tip-tighten-the-line/
6/26/2012
The Summer Fun Challenge Day 3
Oh man... now I wish I had a pool to go in. I also wish it was warm enough to really have a pool party. I have had a lot of fun with this challenge so far.


6/25/2012
Across the Surf
I was going to try doing a ruffian but was too tired when I was polishing my nails. I used some of my mani guides and made a point. I think they are nice but would be really cool if I spent a little bit more time on them.

6/24/2012
TUTORIAL: Autumn Flowers (Flower Technique)
I found this video for a cute flower technique. I figured I would try it and share. I'm still a newbie when it comes to using dotting tools. I need more practice! Anyways, hope you like :)


Target Summer Beauty Bag
I was one of the lucky ones to get another free sample bag from Target. I have to say I was a bit jealous that others started getting their bag almost 2 weeks ago. I am a little disappointed with this one but it was free so I'm not hatin'.


6/23/2012
Graphite
This was a super easy look to do. I wanted to use the plastic wrap dab method I had seen on TBD. They had used a turquoise polish and dabbed gold on it. If you want to look at their finished look, I posted the link at the end of this post. I didn't use any top coat because I wanted to keep the contrast of the matte and metallic look.

 |
| Image from http://skywalker.cochise.edu/wellerr/mineral/graphite/graphiteL.htm |
Excited to use these hopefully soon
I might be a little too excited to get my suspension base I ordered because I have bought a lot of different glitter for polishes. I will probably use these without creating them in a polish for now.

6/22/2012
Purple Diamond Diva
Here is my second foil attempt. I didn't enjoy this one as much as my first one but it's still pretty cool. The foil had an diamond/argyle look to it so I thought the diamond patterned stamp would go great with it. I think I should check out my tie dye foil soon :)

Nothing Duck Tape can't fix...
It totally made a plain wrist brace into a cute accessory :) LOL!! I get so many compliments and questions where I bought it. I used some chain links for the ribbon to go through and double knotted the bow so it won't come apart. Pretty clever right? I can always buy a different designed duck tape to change it up.


6/21/2012
I got this email today from Llarowe... and a message from Lynnderella
| I am hoping this change is a good one for everyone involved. Lynnderella will be selling polishes on eBay and from what she has said, it shouldn't be too expensive.
Lynnderella Update
|
Good morning everyone,
Due to developments over the last few days I have made the decision not to carry the Lynnderella brand on the website or thru wishlists. This decision was not a easy one to make. To my knowledge Lynnderella will begin to carry her products on her Ebay store.
I sincerely apologize for the inconvenience this may have or will cause you.
I will be looking at new lines in the near future and hope to bring you many new polishes in the
future in addition to the wonderful lines we currently carry.
I appreciate your support!
Thank you,
Leah Ann
_______________________________________
**************************************************************************
_______________________________________
|
Lynnderellas will no longer be available at Llarowe. This is a change that I did not want, but it has happened. The decision was not mine, but now that it has been made, I hope to make the best of it. Thank you to Leah Ann for all of her efforts. I wish her all the best for future success and prosperity on all levels.
As you may know, I did open a shop on ebay last night. The reason I did that is because of the uncertainty of where my products would be stocked. I have often wondered about selling on eBay and thought I was probably foolish to not be the person making huge profits on things I created. The concept for the eBay store is that there will be a variety of opportunities to purchase Lynnderellas. I will offer old and new, limited editions and maybe even a few one-offs.
UPDATE: By the way, if you did not see the items sold last night, there were twenty bottles of Connect the Dots for $20.00 each plus shipping. Along with a varied selection of old, new, limited-edition and one-off products, the plan is to offer buy-it-now and auction sales. Some people will receive gifts with orders. Some people will find bargains and some will decide to bid. This is all very new and needs more attention than I have at the moment. Details and further information will be posted when things are sorted.
Since I have spent many weeks preparing for the new collection and a new series of wish lists, the move to eBay will happen gradually. It is discouraging that available quantities will need to be smaller for a while. I hope that I will eventually be back to satisfying more customers. Patience is appreciated.
Thank you.
Lynnderella.
21 June 2012
DIY Lip Smoothie by TBD
Dry and cracked lips ruin how lipstick looks. All you need is a disposable mascara wand (or toothbrush if you don’t have one), lip balm (I use this one for severe cases and this one for a healthy vitality) and a tissue.
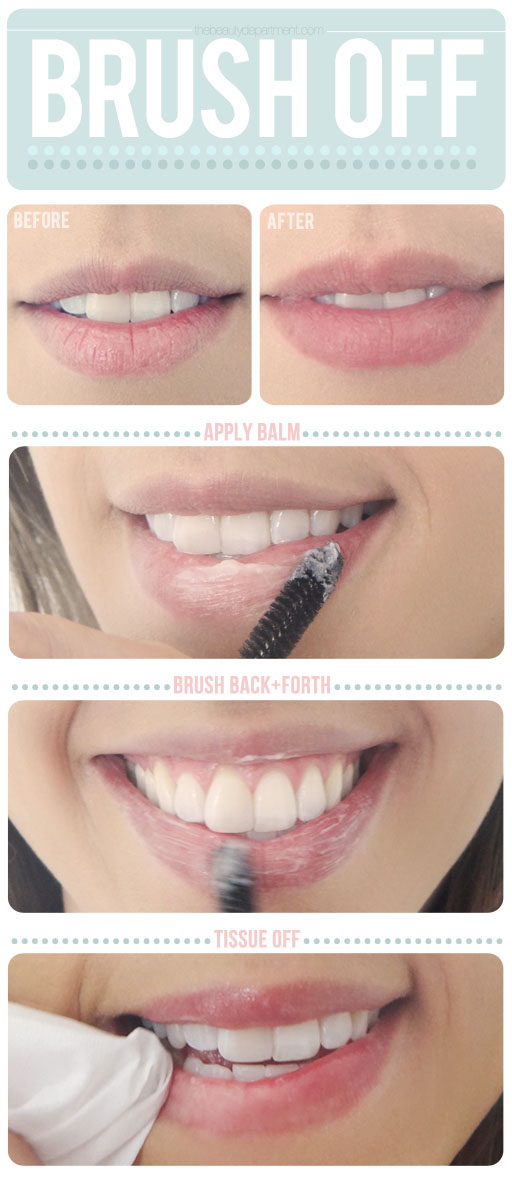
photos + post by amy nadine, graphic design by eunice chun
- Dip the wand into the balm to pick up a decent amount onto the bristles then apply it directly on your lips (I have them start with their bottom lip).
- Scrub back and forth, up and down and in small circular motions in the same fashion you would brush your teeth. Really work on the flaky areas until the loose skin gently breaks off.
- Wrap a tissue around your finger and remove any flaky residue.
That’s it! If you want to stay on top of it and keep your lips polished and crack-free all year round, every time you brush your teeth, before you’re done, brush your lips with your toothbrush as well.
The Summer Fun Challenge Day 2
Woohoo, day 2 of the Summer Fun Challenge! For this mani, I knew stamps were going to be involved. I have a good assortment and actually took a bit of searching to decide which ones to use. When I found the image of the guy and girl holding hands, I knew it was perfect for my mani. Everything evolved around that.

I rotated the pic so you can look at the stamps easier. I have close-ups below :)

6/20/2012
The Summer Fun Challenge Day 1
I am excited to do this Summer Fun Challenge from Lindsey at neverlandnailblog.blogspot.com. This is my first and hopefully one of many :)


6/18/2012
Blog Update
No More Waity, Katie
After seeing this polish on a blog, I immediately found it and bought it. I love the color. It is a greyish purple with lilac glitter. I am not fond of the application or wear. I used 4 coats to get decent coverage. I also had to file my edges because the glitter in the polish made the edges rough. I then noticed that the polish wore off at the edges I filed so I had to reapply some more. But did I say how much I love the color???


6/17/2012
D.I.Y. Makeup Fixer Upper by TBD
Talk about great stuff to know. I have a couple shadows that could use some help. I love how they show both powder and cream fixes. After looking at the cream shadow, I guess my Mac Painterly needs some help too.

photos + post by amy nadine, graphic design by eunice chun
Don’t you just want to cry when you drop your brand new compact and the powder shatters into a million little pieces? But wait! Don’t throw it out and call your losses. You can absolutely put humpty dumpty back together again! And while you’re at it, grab your old cream shadow, blush or liner that has dried out, cracked or shrunk and bring it back to life too. Here’s how to do both:
POWER TOOLS: 70% alcohol {it works 1000 times better for this than your typical rubbing alcohol from the drug store and can be purchased at your local art supply}, plastic wrap, spatula, dropper, synthetic eyeliner brush {I used this favorite go-to liner brush for its round edges and stiff short bristles}, Q-tip {optional if you’re a perfectionist… you know who you are!}
- WRAP IT UP: Completely cover the compact with the plastic wrap and make sure it adheres tightly to contain everything.
- MASH IT UP: With your spatula, crush up the entire pan of shadow, not just the broken pieces. You essentially are turning the pressed powder back into loose powder.
- ADD ALCOHOL: Remove the wrap and add at least 10 droppers full of alcohol. You can add a few droppers full at a time to see how much you need. I used a dozen.
- SMOOTH IT OVER: Now you’ll feel the powder has become sponge-like and very pliable, giving you the perfect opportunity to even it out smoothly with your spatula.
- PERFECT THE EDGES: Use your eyeliner brush to smooth it out even further. Give it a few hours to completely dry and it’s like it never happened! To make it extra pretty, clean up the perimeter with a Q-tip.

To revive your dried-out and cracked old cream shadow, apply the same steps except there’s no need to wrap it up or mash it up. Just add alcohol to reactivate it, stir it, smooth it out and perfect the edges. If you’re like us, you hate waste and these are two great ways to save and use what you have!
http://thebeautydepartment.com/2012/06/d-i-y-makeup-fixer-upper/
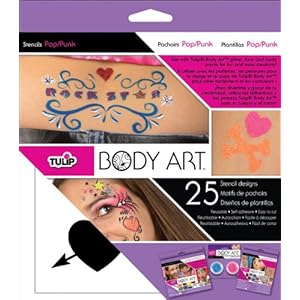
Body Art Stencils
So I bought the UD Starlight Glitter Body Art kit a few months ago. I haven't used it because I'm not fond of the stencils it came with. I recently purchased the Tulip Body Art stencil kit in the Pop/Punk version. It came with 25 different stencils. They are definitely cute!
6/15/2012
Simply Vera shoes simply broke!
I bought these super cute shoes from Kohls and was excited because they were my fav color and matched my Coach purse. I had to return them within a couple hours. It was embarrassing... I busted my ass hitting my left knee, arm and head because the shoe broke! It was cheaply made. I never would have thought Vera Wang shoes would fall apart so easily. Oh well, lesson learned.


Suede Fibers
My first foil!!! I can't believe it was so easy. I had a bit of thinking to do because I have 6 different foils and I had to choose one. I was a bit scared to use this one because of the lines but it worked out great. At least I think so :)

6/14/2012
Easy Bumped Ponytail (w/out teasing or a Bumpit)
Perfecting Your Brows
With so many brow styles out there, how do you know which one looks best on you? Here is some info on figuring that out.

6/13/2012
Share the Love bonus item!
The "Take Three Free" Zoya Pinterest Contest was a great success and the Zoya Pinterest Trios are now SOLD OUT!!!
Since only 2,000 Limited Edition Mini Trios were available, we wanted to reward those who missed out but still participated in the contest and pushed for their favorite colors...
That's why NOW through 6/25/12, 11:59 PM EST we are offering any three, full-sized (0.5oz bottles) Zoya Beach and Surf Collection colors for ONLY $15 + Free Shipping!
That's why NOW through 6/25/12, 11:59 PM EST we are offering any three, full-sized (0.5oz bottles) Zoya Beach and Surf Collection colors for ONLY $15 + Free Shipping!

This offer is listed as a Share the Love bonus item in your online account at www.zoya.com. We have deposited (1) Share the Love Point into all existing accounts. To redeem this offer please follow the instructions below...
Instructions
- Sign into your account at www.zoya.com
- Add any (3) colors from the Zoya Beach & Surf Collections to your shopping bag.
- Go into "My Account" and you will find the "Any 3 Zoya Beach and Surf for $15 Pinterest" Special Offer listed for (1) Love Point under "Redeem Points" (Shown in your account snapshot).
We added 1 " Happy Point " to everyone's Share the Love Account so that you can participate. - After redeeming your special offer, click "My Promotion Codes" on the left hand side of the screen to apply the code to your order.
- Complete Check-Out Process, Review and Submit Order.
Subscribe to:
Posts (Atom)