4/30/2012

A Perfect Arch is Perfectly Achievable

There are several steps to obtaining beautifully shaped eyebrows, and it will update and refine your look instantly! A few helpful hints: 


  1. Avoid over-tweezing. Full brows are more modern, and over-tweezing makes your brows grow back more sparsely, leaving you to have to pencil them in later on in life. 
  2. Try not to pencil or shade in brows unless absolutely necessary. If you must fill in your brows because of sporadic growth, try using a firm flat brush and powder that is one shade lighter than your hair color. 
  3. Dip the brush in water, blot with a towel and dust off prior to applying. Subtle application is key. 
  4. Lay a piece of toilet paper flat against your under-eye catch loose powder. 
  5. Finish by applying clear mascara to sweep your brows into place.

Photobucket

4/29/2012

Nailing the At-Home Manicure by Deborah Lippmann

From buffing to polishing, your definitive guide
Nail guru Deborah Lippmann has polished everyone from Sarah Jessica Parker to Mary J. Blige, not to mention countless models and social butterflies along the way. But she says you don’t have to be a pro to master the mani — just follow her step-by-step guide. Files at the ready? Polish on.

Mascara Wands: Do They Make A Difference? by TBD


photos + post by amy nadine
If you’ve always wondered if the type of mascara wand you use is important, this experiment is for you! I coerced my assistant Carissa to model again and to make sure that the only variable was the wand, we used the same formula mascara (L’Oreal Telescopic) with each wand, did exactly two coats of each and completely took it off in between applications. The results may look subtle but to me are maaajor!
  • PLASTIC COMB: You can see it really separated the lashes from each other, gave adark color payoff and lengthened them.
  • NATURAL BRISTLES: The wand created a soft + light look, which I’m equally a fan of, especially when hanging with your honey and want “pet-able” lashes (revisit our dating makeup post here). And it made them look fuller + more voluminous.
  • PLASTIC BRISTLES: This wand kind of married the two above by creating darklong +full lashes! Very interesting! The only downside is they are stiff (not soft + pet-able).

Luxe & Lush Sugar High

I had painted my nails on Saturday, using my Nubar base coat, and half of my nails lost the polish. It just popped off! I think I need to toss the base coat. I am not excited about this because it wasn't the cheapest. Oh Well. So I re-painted my nails last night and this is what I came up with.

ScaredyCatCosmetics Trial Vials

Eye Shadow Samples - Scaredy Cat Trial Vials - Choose Any 5 Colors for 5 Dollars


4/28/2012

Red Carpet look by TBD


BOLD BROW: Krysten has amazing big brows and wanted them even more pronounced (yes!), so I filled them in with a dark brown shadow using a stiff angled brow brush. I used Smashbox Brow Tech {$24} in Dark Brown but also love Maybelline Ultra Brow Brush on Color {$5.98}.
CORNER FLUSH: Nothing is prettier to me right now than a happy pink blush placed high on the cheekbones. I used VS Makeup Luminous Mineral Blush Duo {$15} in At Last that I can’t get enough of this season because I love mixing both the frosty and solid pink shades.
LIP POP: Krysten rocks a red lip like no one I’ve ever seen, but this time we thought it would be gorgeous to do a rosy tinted lip balm for a softer look that still added a bold pop of color. I used Tarte Cosmetics LipSurgence {$24} in EnchantedCovergirl NatureLuxe Gloss Balm {$6.49} in Peony is super pretty too.
xoxo


http://thebeautydepartment.com/2012/01/tbd-to-red-carpet/#more-5112


Photobucket

4/27/2012

The Perfect Red Lip by TBD

I've heard everyone can pull off a red lip but haven't been able to figure it out. I guess I prefer a lighter lip. I am trying to get into more vibrant lip colors. This tutorial helps a lot.


TOOLS:
-toothbrush or disposable mascara wand, lip balm, nude lip liner, red lipstick (our favorites are Bite Beauty High Pigment Matte Pencil in Pomegranate and NARS Pure Matte Lipstick in Vesuvio), eye shadow blending brush, translucent loose powder, lip brush
1) Using a toothbrush or disposable mascara wand + lip balm, remove any dead skin by gently scrubbing in circular motions. **This is crucial especially when wearing a matte finish!
2) Outline the perimeter with a nude liner to prevent feathering.
3) Apply red lipstick directly from the tube.
4) Using an eyeshadow blending brush + translucent loose powder, powder your lips to really set the color.
5) Apply a second coat with a lip brush to smooth edges + perfect lines.

4/26/2012

Butterfly on Four Leaf Clover

Here is a very Springy mani. I wanted to do another contest and something different. My nails are long enough to put the butterfly stamp on my ring fingers. Normally my nails are shorter that this.

DIY Headband Holder by TBD


I made something like this but I needed more space for headbands. I had a three foot empty roll and wrapped batting around it to get it bigger. I bought a remnant from Joann's and sewed it on. I put some ribbon through the roll and made it hangable. Now I just have to hang it up and put my headbands on it. Here are 8 easy steps to making one of these helpful holders.

10 great alternative uses for dryer sheets


Cure clingy clothes. With the swipe of a dryer sheet you can do away with clingy, static-ridden clothes in seconds. I suggest carrying a dryer sheet in your purse to avoid said situations. It will make your bag smell nice, too. 

Scent your stuff. I like to tuck a fresh sheet into my drawers. I love the subtle fragrance they lend to everything stashed away with it. This is also a good trick for gym bags, suitcases or even smelly sneakers (ew). 
Tame frizzy hair. Don’t you hate it when you’ve just blow-dried your hair, smoothed on some anti-frizz serum and yet your strands are still determined to go haywire? Static + hair is never a good combination. To combat Medusa-like strands, simply run a dryer sheet over your tresses. Trust me, it may seem odd but it works like a charm.
Wipe away pet hair. Forget your lint roller. Dryer sheets are great for doing away with unwanted pet hair and lint on clothing, furniture—you name it. 
Repel bugs. If you loop a dryer sheet around your belt or put one in your pocket, it will repel mosquitos and bees.  
De-squeak Your Shoes. Quiet them down by rubbing the bottoms with a dryer sheet.
Freshen your ride. Slip a few dryer sheets under the seats in your car. It will keep your whole car smelling so fresh and so clean. 
Dust it up. Dryer sheets can be used on nearly any surface to do away with dust. 
Help your hairbrushes. Clean brushes mean clean hair. Fill a bowl with warm water, add a couple dryer sheets and then place your hairbrushes and combs into the mixture. Let it soak for a few hours. Rinse. Dry. And voila—your brushes are like new!
Ditch deodorant stains. Use a dryer sheet to wipe away unwanted deodorant stains on your clothes.


Photobucket

Modern Topsy Tail Updo by Birchbox

I found this video for another cute and easy updo. I'm going to see if it will work with my shorter hair. Since I'm growing it out, I know this will eventually be a style I would sport. Anyways, check it out :)


If you see a box that says "Page Cannot Be Displayed"... hit the reload link


Photobucket

Crown Me Popular

My poor hands are beat up! I was going to just use the Revlon Popular but as always, I wanted to add flair. I put OPI Crown Me Already on the tips and faded it into the other polish. It works well because Popular has different sized silver glitter in it too.

4/25/2012

Linked pink... updated version of How I Met Your Caviar

Well one of my caviar nails fell off while ripping apart boxes to recycle so I replaced it with a painted nail. I decided to do the opposite gradient with a complimentary stamp image. 


Here are the colors I used. The WnW fastdry colors worked very well for the gradient. I just kept dabbing at each finger until it had a good fade. I think I went too far up with the Blue/Violet colors but it still looks cool. What do you think? Caviar or this?


Photobucket


Inner corners of eye

Applying a light color to the inner corners of the eyes brightens the face. It also widens and separates the eyes by creating the illusion that they are further apart. I like using pearl white, silver, or gold. The color I choose depends on other colors I used on my eye. The only rule is to pair it with darker shades on the lid, as it has to be the lightest shade on your eye. 
After finishing your eyeshadow and liner, apply a highlighting eyeshadow, eyeliner, or shadow stick in a light shade using a dome-shaped shadow brush or fingers. Make sure to do this before applying mascara. Swirl the brush or pat your index finger in the highlighting shadow then with eyes closed, press it directly on top of your inner corners (the width of your finger/brush will automatically cover both the top + bottom part of your lids directly to the sides of your nose). If you’re using an eyeliner or shadow stick, cover the same areas as listed above, just make sure to go back with your finger and blend. Such a little thing to do that does so much!


Photobucket

4/23/2012

Sandy Gold Franken

I have been trying to create a base that doesn't settle... no luck yet but getting closer. Anyways, I mixed a couple things together to get this pretty polish. The glitter did settle after a few hours but was very easy to shake and mix everything back up. The pigment never settled. Below are swatches and the products used to get color.

How I met your caviar

This nail look is something new... I have never done a real gradient or caviar nail. As you can see, I attempted both and think I was very successful. I didn't even have to do any nail over. 

4/22/2012

Zoya True Spring 2012 Nail Polish Collection

Zoya sent me this spoon with my Arizona order. I wasn't expecting two spoons but it's cool because I get to see three collections. This spoon contains the Tru and Fleck Effects collections. The top row is the Tru colors. The bottom row shows the three Fleck Effect colors alone and the other three are colors from the Tru collection with Fleck Effects on top. The close-up pics are below.


Zoya Beach & Surf Summer 2012 Nail Polish Collection

When I bought my Zoya Arizona polish, I received two color spoons. This one is the Beach & Surf. I can't afford all of the colors and this works just as well. I have taken closer shots of the colors below. I love how these are bright. Definitely summer colors!

4/21/2012

Cheeky Arizona

I got my new Zoya Arizona polish yesterday. It is from the Beach & Surf collection. Used points from the Share the Love program to get a free polish and only paid shipping. 


4/19/2012

Metallic Green Androgynie

My Kleancolor Metallic Green was screaming at me so I grabbed it and thought up different ways I wanted to sport the color. At first I was going to paint my nail green and put something over it but that obviously changed. 

Beautician Magician: A Voluminous Lip Illusion by TBD


BEAUTICIAN MAGICIAN: A VOLUMINOUS LIP ILLUSION


photos + post by amy nadine, design by eunice chun
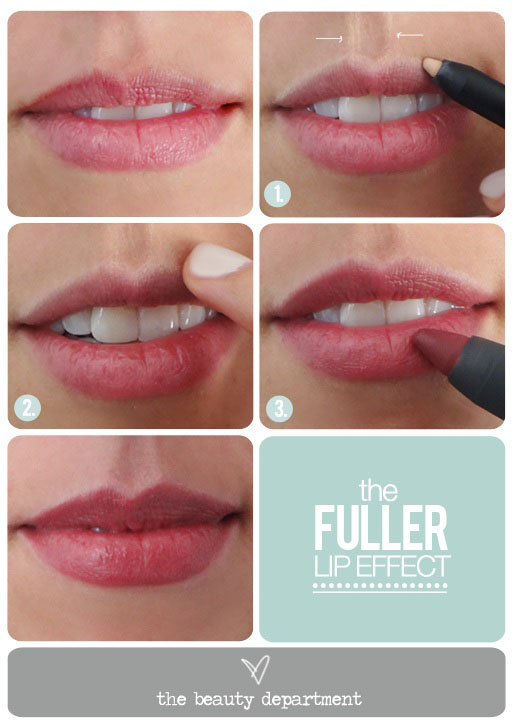
We get a lot of emails asking how to make thin lips look fuller. So today I’m happily sharing one of my biggest secrets as a makeup artist! This ten-second trick instantlybut subtly makes any-sized lips appear fuller using a concept from Basic Art 101: you add dimension by playing with shadows + light. If you want to bring a feature forward, you make it lighter, and if you want to push something back, you shade it darker. So to make the lips appear more voluminous, simply outline the top lip + the philtrum (the two midline grooves that run from the top of the lip to the nose) to highlight it. It’s a lot safer and less expensive than fillers and looks more natural.
If you have fair to medium skin, use NARS Larger Than Life Liner in Rue Bonaparte like I used on my assistant Carissa above. If you have tan to dark skin, use Stila Kajal Liner in Topaz.
  1. Start by tracing the two lines of your philtrum from your nose to your upper lip. Then trace the cupid’s bow (the area between the lines) and from each point to the outer corners. Only line the upper lip (leaving the lower lip natural).
  2. Lightly blend the line with your finger to make it undetectable but enough to still do its job.
  3. Finish by filling in your entire lips with a color/finish of your choice. We used Bite Beauty High Pigment Pencil in Rhubarb but you can use a liner + lipstick, just lipstick, just gloss or a tinted lip balm… whatever you are in the mood for that day!

http://thebeautydepartment.com/2012/04/beautician-magician-lip-illusion/


Photobucket

Sleek Acid Neon

I recently purchased the Sleek i-Divine Acid palette and it came today. I love all of the bright colors! Everything I used is matte which is probably why it photographed so well. I had to buy it on eBay due to FDA regs not allowing it to be sold in the US. I dunno.

4/18/2012

Illamasqua Sealing Gel

One drop of this cult product turns any powder into a colour-intense, water-resistant paste that dries quickly and lasts for hours. Blend with Powder Eye Shadow, Pure Pigment, Eye Brow Cake or Eye Liner Cake and use across the face and body for endless creative opportunities. Be bold, be original and stand out from the crowd.

I paid $19.09 from ASOS. It was a lot cheaper than through the Illamasqua website. I have used it twice so far and love it. It is very easy to use. The best thing is you get two small bottles in one box.


http://www.asos.com/Women/Beauty/A-To-Z-Of-Brands/Illamasqua/Cat/pgecategory.aspx?cid=8368&WT.ac=Beauty_Illamasqua


Photobucket

Kitchen Beautician: Lip Color by TBD

Another cool post by The Beauty Department! I don't know how many times I couldn't figure out what lip color to wear because nothing went perfectly with my make-up. I might try this next time I find myself at a loss.


photos + post by amy nadine


Our Kitchen Beautician Series is back with a fun + easy way to make your own shade of lipstick! If you have lipsticks that you’ve grown tired of or bought online but wish were a little softer/brighter when they arrived… or others that are a little too matte that you know would pop more with a bit of shimmer or a metallic finish, here’s how to take matters into your own hands! But please remember to always be careful when using your stovetop and you MUST have parental supervision if you are under 18!


TOOLS: the original lipstick (I used MAKE UP FOREVER Rouge Artist Intense in 40 above) + your choice of a metallic shade (Dolce & Gabbana Shine Lipstick in Gold is brilliant for mixing) or a light shimmer nude (I used Tom Ford Beauty Lip Color in Nude Vanilla above), a spatula (I used Cinema Secrets Spatula above) or kitchen knife, a spoon, a flame (stove top works best!), a mini plastic jar + optional lip brush (both can be purchased at your local beauty supply store).
  1. With the spatula, slice off a section of each lip color and place directly on the spoon. You can get creative with the ratios of each color and even go back and add more of one until you have your perfect shade.
  2. CAREFULLY place the spoon directly above (four inches is best) the flame (medium heat) until the product starts to melt. Be prepared for it to start melting within 10 seconds!
  3. With your spatula, start to swirl the colors together for an even mixture.
  4. Pour the new lip color into your plastic jar and allow 5 minutes to harden.
  5. Voila! Use a lip brush or your finger to apply your one-of-a-kind shade and have fun playing with the ratios and finishes! This technique is how I made a lovely peach for Lauren Conrad’s runway show in 2009 that we sent to Mark Cosmetics and they duplicated the shade for a limited edition gloss. (Sorry it sold out but I can’t wait to see your creations!)

Ahoy! Chunky Holo Fuschia

I wanted to do a gradient glitter tip and thought the combo of China Glaze Ahoy! and Kleancolor Chunky Holo Fuchsia would be suddle and pretty. Boy was I right! The pictures don't do it much justice.

4/17/2012

More stuff from my Haul

Here is more stuff I got last week. I have been busy working on other things and forgot to post this. 

Steal Urban Decay's looks

Urban Decay
Link to page


If you didn't know, you can learn how to achieve some of Urban Decay's signature looks from their website. There are 28 looks and 14 videos. Check it out for ideas.


Naked
Vamped Glitter     Crystallized


Photobucket

DIY: Caviar Nails by Polishandpearls.com

So for those of you that are interested in doing your own caviar mani... Below is a video Polishandpearls.com posted showing items used and application to achieve this look. I think I'm going to try this over the weekend. I love the look.


http://polishandpearls.com/diy-caviar-manicure/


Photobucket

4/15/2012

Great customer service rocks!

So I contacted Giorgio Armani because one of my ETK intense shadows consistency changed for some weird reason. I contacted them via email and they replied very quickly. They ended up sending a refund check for $32. I love it when I get awesome customer service.

I also have had great experiences with Allthatglitters and Allcosmeticswholesale.com. I had received a product that had broken during shipment from each seller. I contacted them and got a replacement. It was too easy.


Photobucket

Cassi Shooting Star

I have gotten lots of compliments on this look already! I wasn't going to put a glitter polish on but it was calling my name. 

NYX Glitter Mania Jumbo Pencils

I recently purchased six NYX Glitter jumbo pencils off of eBay. Can't get these anymore!!! They add a little sparkle anywhere you like... your eyes or lips! They're excellent for adding glitter with precise lines.


4/13/2012

UD Starlight Glitter Body Art

Here is my new UD Starlight Glitter Body Art Kit. It looks like it could be fun to play with. I'm not a huge fan of most of the stencils but they should be pretty easy to make. I think I can cut some vinyl and use it as a stencil. Anyways, here it is...