6/10/2012

DL Candy Shop

I have four Deborah Lippmann polishes and had only wore one so far. Here I am sporting Candy Shop. I love the massive amount of glitter in a pretty pink jelly.

6/09/2012

TUTORIAL - Acid Neons - Sleek Acid Palette

I found a tutorial for the Sleek i-Divine Acid Palette. It is similar to my other neon look but I used the tutorial to do this look. It is very easy! I wore a matching headband with a cute florescent orange flower on it.

6/08/2012

Cheekbone Envy

Whether you prefer symmetrical contouring, windswept cheeks, or a dewy, fresh-out-of-the-steam-room glow, you can add dimension and brighten your entire face by sweeping color on your cheeks.

Contouring - Mode, sophisticated and ideal for adding a little drama to your look, "contouring" enhances your natural bone structure while creating symmetry.

  • Create the contour line: Pucker lips lightly and start in the center of your cheek (where you might find a dimple.) Using a medium-sized brush, sweep color upward toward the outside of the eyebrow, above the ear.
  • Use the right color for your face: Shading with light colors highlights areas, while accenting with darker colors draws attention away from the area in which it is used. Use a peachy color that is similar to your complexion to highlight apples, and a deeper, neutral shade to accentuate cheekbones.
  • Blend: The key with contouring is subtlety. Blend upwards towards the hairline. 

Sun-drenched and wind swept - The combination of contouring and sun-kissed application techniques gives the mysterious illusion girl next door meets sex kitten.

  • Pucker: Create contour line with a neutral shade. Apply pink or peach blush to apples of cheeks and blend outwards.
  • Apply illuminator. Blend well and apply lightly.


Dew-kissed cheeks - Perfect for an all-natural, healthy-looking glow.

  • Smile: Apply cream or powder blush in a neutral shade (pink and peach shades are best) to the apples of your cheeks.
  • Get the glow: Finish by applying an iridescent illuminator. Apply a dab of shimmer to very top of forehead (just beneath the hairline,) to the bridge of your nose (go lightly!) and to the tops of the apples of your cheeks. Applying shimmer in these areas, bounces light from one area to the other, brightening the whites in your eyes. 


Photobucket

Spotted Stones

I was in a super hurry to get my nails done before work. I remembered my Rimmel Grey Matter is a 60 seconds dry so I grabbed that. I looked down and saw my Sticks n Stones polish and knew what I was going to do. I took quite a few different polishes for this look but I think it was worth it.

6/07/2012

Mani on the go kit

The Beauty Department has a post about having a nail mani to go kit. They used an eyeglasses case to hold the seven mani items. Genius! My different items float around in my purse. I don't carry a polish but I am going to start. The items they say are...


  1. Cuticle nippers
  2. Metal cuticle pusher
  3. Cuticle oil pen (I use my California Mango cuticle balm)
  4. Nail polish remover wipes
  5. A favorite seasonal nail color
  6. Clear top/base coat
  7. Mini nail file
Now I must find a super cute case.


Photobucket

Polka Dot Bikini

This is my first attempt at doing a polka dot mani. I usually keep to using stamps, guides, and special polish like crackle polish. I was going to use different colors for my polka dots but remembered I have Sephora by OPI nail art pens. They work perfect for making polka dots. I have realized I need a lot more practice using my left hand... def not as pretty!

6/05/2012

Eury Pearlfection

 If you have read my blog, you would remember I tore up part of my Nars Eurydice eyeshadow duo and made a nice polish out of it. I haven't worn any of the polishes I have made so this is a first. As usual, I can't manage to keep a nice, simple nail so I threw on a coat of Essie Luxeffects Pure Pearlfection. I'm liking the combo :)

6/04/2012

Shenanigans nails

I decided I was going to wear my Fyrinnae Shenanigans pigment and decided to paint my nails to match. Sometimes I love being matchy matchy. The headband I wore also matched. My clothes however didn't because my uniform is a dark blue polo with black pants and shoes.

6/01/2012

Metallic Half Moon

Here is some metallic goodness! After doing my nail polish inventory, I decided to used some of my newer polishes. I have a huge amount that haven't been used. I'm going to try to use them in up coming nail looks.

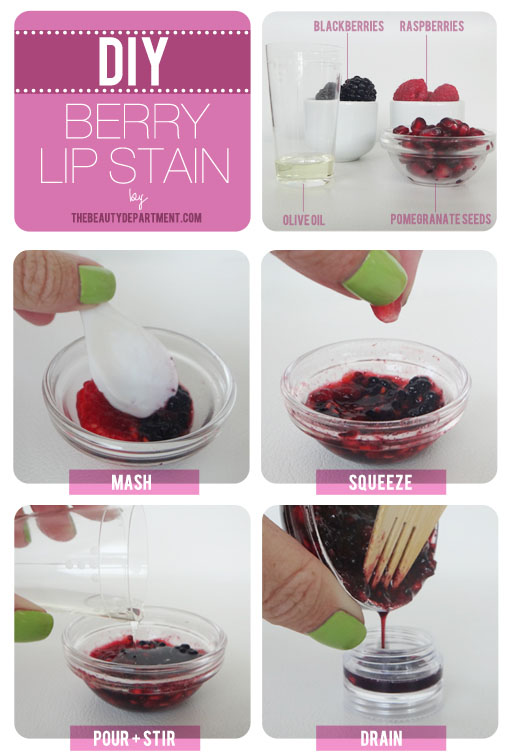
Homemade Lip Stain by TBD

How cool is this? I know this is how women achieved lip color way back in the day. This DIY shows us how to add the perfect “just-bitten” hint of color to fake that Snow White luscious lip! Here’s how to do it yourself:

photos + post by amy nadine, graphic design by eunice chun

INGREDIENTS: 3 Blackberries (for their bright berry color), 1 Raspberry (for its feminine pink color), 3 Pomegranate Seeds (for their vibrant red color), 1/2 teaspoon edible oil (I used Extra Virgin Olive Oil), a small Bowl + Spoon (or mortar + pestle if you have them), Fork or Sifter to drain, small 5-gram Pot/Jar with screw top from any craft store

STEP 1: Mash the blackberries and raspberry in the bowl thoroughly with the back of your spoon.

STEP 2: Add the pomegranate juice into the mixture by individually squeezing them between your thumb and index fingers over the bowl.

STEP 3: Pour the olive oil into the bowl and stir everything together with your spoon.

STEP 4: Finish by draining the liquid from the mixture into your small portable jar.

For application, use your fingers, a lip brush or a Q-tip. It’ll only be good for a few days so refrigerate it for longevity. Have fun with it and even try different fruits (acai berries, cherries, etc)! You can play with the ratios of each fruit to customize your desired shade but you’ll get the most color payoff from the blackberries.