So I am a huge football fan... Go SD Chargers! I wanted to wait until today to post my football mani. San Diego was playing today so I showed a little more team support than usual. I wear a pink Chargers lanyard at work to support my team.
Pages
▼
My Pain In The Grass mani
So on Saturday I went to an all day concert called Pain In The Grass. I got to see a few of my favorite bands... Chevelle, Three Days Grace, and The Offspring. The only thing that bugged the whole day was the grass was seriously wet even though it hasn't rained in forever. I wore a cute top with these colors in it.
Leo's Holo Clover Pilot Jacket
I am so behind in my posts... a whole 3 days! I actually took pics every day but was so busy I couldn't get time to post. So here is my Friday mani.
9/27/2012
Blue-Eyed Girl
I have to say this polish has been the hardest to capture with my cam. The pictures def don't do it any justice. I have to say Kleancolor makes some really pretty polishes. I have gotten quite a few compliments on this one. This one is in my top 5 favs from Kleancolor.
9/26/2012
Put a Pin In It
I made another polish and want to share! I also wanted to do something a bit different. I hadn't done this type of mani yet with the triangles. I also used a new Color Club Polish color. This post is full of new and untrieds.
9/25/2012
Shattered Flurry
I recently purchased Sally Hansen In A Flurry and wanted to try it out. It is part of the SH Fall line and probably still available. It is very pretty on it's own but I hardly ever wear a polish alone. I usually do something to it. I was going to stamp it but didn't feel like doing it when I had the free time.
9/24/2012
Copious
 Yesterday I decided to sign up for Copious through an invitation link on a blog. Copious is a social marketplace for buying from and selling to people. By using the invitation link, I got a $10 credit to use for items I purchase. I also got a $10 credit for signing up. One of these $10 credits has to be used all at once so the item has to cost more than $10. I have to say that I spent all of my credits yesterday. The one stipulation is that you MUST pay $.01 minimum on every purchase you make. I bought Spoiled Ants In My Pants nail polish for a total of $.50 after using some of my available credit. That also includes shipping. I think it's a great deal since you aren't obligated to anything afterwards.
Here is my invitation link for you to use: https://copious.com/invites/505fd25fcf8cca607a00ab35. This link gives you a $10 credit and once you purchase something, I get a $5 credit to spend.
Textured Fantasy Fire
I had seen a mani where the Fantasy fire peeked through a stamp so I did this one. I have to say it looked so pretty in the sun. I think a different stamp would have been better for this.
9/21/2012
Framed Lace Material
So I'm currently watching the iHeartRadio concert. It is so awesome! Green Day is on right now. I'm a bit sad I will miss most of tomorrow's line-up. Hopefully I can at least see the last few acts. Anyways, I am going out tomorrow and painted my nails to go with my dress... it is burgundy and white. There isn't any lace on it so I added some of my own.
9/20/2012
Fall Into Autumn Challenge! 4 - Cloudy Days
We haven't had a cloudy day in forever... at least it seems that way. I had a different idea for this mani but changed it last minute. I remember seeing a ruffle mani tutorial by Sarah at Chalkboard Nails. I decided to shorten the ruffles to only the tip to make it look like fluffy clouds.
My September Ipsy bag
For those of you who don't already know, MyGlam is now Ipsy. The site has quite a few new things added. You should check it out! The monthly subscription is still the same. Anyways, on to my goodies :)
9/19/2012
Knackered Wednesday
So I got my Ulta package in the mail a few days ago. They were having a BOGO sale for Butter London polishes (limit 2) so I got Knackered and Dodgy Barnett. I do have to say that I am glad I got Knackered. Although the application is really thin, it is a really pretty color. It has to be worn over another color because it would take way too many coats to get it to an opaque finish. I thought Zoya Wednesday would be perfect for showing off the different colors that Knackered reflects. I have seen purple, green, and gold.
Circles 'n Plaid
Plaid and Circles... who doesn't love that? I was playing around and somehow thought I'd practice with my striping brushes and dotting tools. I still need some practice!
9/18/2012
Insta-This Gold Rushed
I was busy with a pair of scissors and gold foils to make chopped up gold flakes. When I was chopping up the foil, I had mentioned to a friend that I would make it and wear it over blue... This is it.
9/17/2012
Fall Into Autumn Challenge! 3 - School Spirit
So I decided to use my high school for this week's challenge. I went to South Kitsap High School in Port Orchard, WA. We are the SK Wolves. Our school colors are... Maroon, Gold, White
9/16/2012
The "Bespoke Look" by Coterie
THE DIY MIXED-FINISH MANI
The Coterie Bespoke Look

THE DIY MIXED-FINISH MANI
The Coterie Bespoke Look
What You Need:
- butter LONDON Nail Lacquer
- Matte Finish Topcoat
- Scotch tape
- A girlfriend, a glass of red wine, and two or three types of hard cheese
- Clean and groom nails
- Paint your entire nail with butter LONDON Nail Lacquer. Let dry.
- Apply second coat of the same color. Let dry thoroughly. This is an ideal time for a wine and cheese break.
- Stick a small piece of Scotch tape over the part of your nail that you want to remain shiny. If you have amazing hand control, you can skip this step and apply Matte Finish Topcoat freehand. (NOTE: You can apply a second shade of Nail Lacquer instead of Matte Finish Topcoat. We recommend pairing Wallis with West End Wonderland and Knackered with Bluey.)
- Apply Matte Finish Topcoat to the exposed portion of your nail. Peel away tape before the nail lacquer dries.
9/15/2012
Puzzle Party
Well I skipped out on posting yesterday because I lost track of time. So I decided to add a cute stamp to my nails. Funny thing is today I was going through my iPad testing out apps I installed and found a great puzzle app. It was very hard but I got it! Yay!
9/13/2012
September Birchbox
So I received my September Birchbox yesterday. I got a few things I am excited about! I think Birchbox is the best subscription service I have tried so far. I definitely get more than $10 use from what comes in each box.
Disco Edyta
Look... Polka Dots! I had painted my nails with the Zoya Edyta and wanted to do more. Since my nails are so short, I am limited on some things. I was going to do a gold plaid but thought I'd try polka dots again.
9/12/2012
Absolutely Rusalka
I have been falling behind on my manis! I haven't been feeling very well the past week. Anyways, I have this pretty mani. It is simple... glitter polish over creme base. I did however create this glitter polish about a month ago and am happy to show it off.
9/09/2012
Kreativ Blogger award
I got another award! Thank you Christine from Apply Polish Here :) I love getting these cute awards as well as passing them along to other bloggers. With this award, I have to tell you five things about me and then tag five blogs.


9/08/2012
Fall Into Autumn Challenge! 2 - Apples
So here is challenge number 2. I really liked the other manis from the ladies doing the Fall Into Autumn challenge. I wanted to do something different. Since me and a nail art brush don't get along too well, I found 3 different apple fimo sticks and threw on a few slices of each.
9/06/2012
Leopard 'n Lace
I bought a 6 mini set from Hard Candy and a couple taupe colors at Walmart the other day and thought I would use a few. I have a bunch of new polishes to use soon. I recently bought 6 Zoya polishes when they had the buy 1 get 1 free. I bought 6 so I could get free shipping... 6 polishes for $24. Not too shabby.
9/05/2012
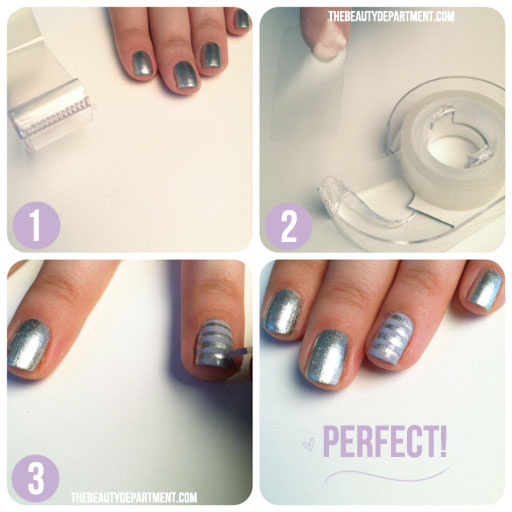
The Tape Trick by TBD
After I did my recent half moon mani, The Beauty Department posted this. I am pretty sure I don't wait too long to pull the tape but maybe I do. Next time I'm going to do one finger at a time and pull it off right after painting.


photos/post/graphic design: Kristin Ess
We get so many emails + comments regarding the tape mani. I’ve heard that many of you have trouble peeling the tape back without messing the mani. So here’s the simple trick!
- Paint your base coat and let it dry for a full hour. Remember– you never want to make the base coat too thick because the thicker it is, the longer it takes to dry.
- Take a piece of tape and blot the sticky side on your fingers and on the palm of your hand. When you do that, the oils from your hands stick to the tape making it significantly less sticky and easier to peel off the base coat.
- Paint your nail, wait about one minute and then peel. Personally I don’t like the polish to dry too much before I peel because it gets “stringy” when you peel it. On the other hand, you don’t want to do it right away because if it’s too fresh, it can run.
Another option is to use painter’s tape. It’s designed to be less stick and to not peel off the paint that you stick it to. This is just a DIY option! Good luck ladybugs!
9/04/2012
Claire's connecting the dots
I really couldn't wait to use one of my new Julep creme polishes and Lynnderella Connect The Dots. I really love the sky blue color of the Julep polish. It almost reminds me of the "Grabber Blue" color on some of the newer Mustangs.
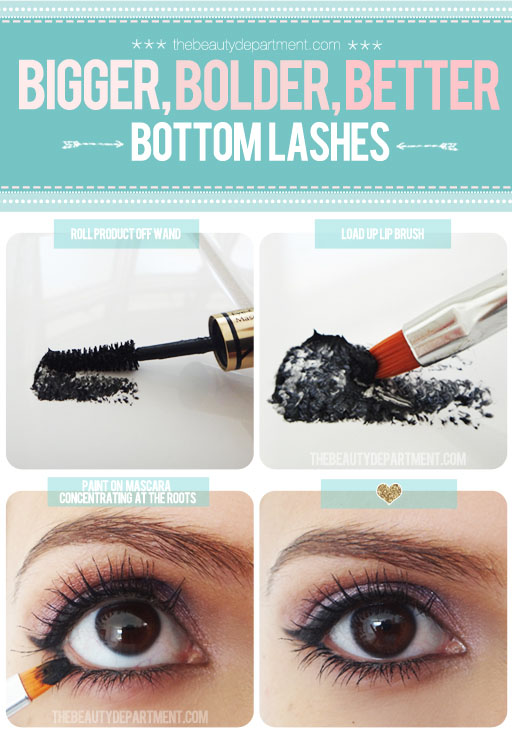
Painting your bottom lashes by TBD

photos + post by amy nadine, graphic design by eunice chun
Bottom lashes can be tricky… like all lashes, you want most of the product to land on the roots, not the tips (that’s where things become clumpy), but it’s really hard to do it with a wand. For years I would rotate the wand vertically and use the tip to paint the bottom lashes, then I finally discovered that nothing builds the bottom lashes better than painting the mascara on with a lip brush! You don’t even need a business card underneath to paint against (but you can certainly use one if you want to) because the flatness of the brush let’s you be precise without too much pressure. Here’s how to make it happen:
On a washable surface (I use the back of my hand but you can use a clean countertop), roll the wand with a little pressure until there’s enough product for you to load up half of the width of your brush. I rolled off more product in the picture above just for instructional purposes, but you definitely don’t need that much!
Grab your flat lip brush and load it up with your favorite mascara like you would a paint brush. You can use a mascara fan brush that is specifically made to paint on mascara, but I don’t want you to have to buy anything when you already have a suitable lip brush in your arsenal.
Paint on the mascara by making small strokes, concentrating at the roots. Work on one section of lashes at a time, painting a few coats on each section, with stronger pressure at the roots and lighter pressure as you make your way to the tips.
BONUS: When you concentrate at the roots, it creates the illusion of lining the lash line as well. {Our model Carissa isn’t wearing ANY bottom eyeliner in the pictures above.}
http://thebeautydepartment.com/2012/08/the-paint-job/
I got a Julep Maven box!!
I had seen a Julep ad and thought I would check it out. I received $10 off my first month for signing up. I figure that I can at least spend $10 and get some polishes. I ended up with 5 nice polishes. They applied so nicely on my polish wheel. One coat was perfect coverage. I still need to test it on a real nail.
9/03/2012
Fall Into Autumn Challenge! 1 - Back to School
So here is challenge number one in the Fall To Autumn challenge. Most of the ladies from the Lazy Days Of Summer challenge are doing this one as well. This time we are doing one a week. I still have to do my last one for the LDoS. Anyways, the first challenge is "Back to school". I wanted to do something different and new for me. I decided doing crayon nails would be cool so here they are.
9/01/2012
Grey-t To Meet Your Magenta
I wanted to use my new Essence polish Grey-t To Be Here. I wanted to really show off the light pink/orange glitter shimmer. I have a pic below that shows off the shimmer the best. I have to add that I thought I threw away my cheap reinforcement stickers but I managed to find them :(


